These customers in Gilbert, AZ, decided it was time to remodel their master bathroom. Their 13 year old house still had the original glass panel shower enclosure and an acrylic bathtub that was installed by the home builder. This project was something they’d been considering for a couple of years; we’re delighted they chose Arizona Granite for their bathroom remodel. They kindly allowed us to photograph the process, and worked with us on this case study so you can get a better understanding of the process.
Bathroom Remodel by Arizona Granite – Our Experience
The house was built in 2001; we wanted to tear out the master bath since we bought the place in ’08, but the timing and economy were never right. Now that house prices have recovered, we were more confident in making the investment in a new bathroom.
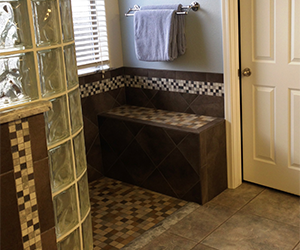
Carlos came out to listen to what we had in mind for the bathroom remodel, and give us the benefit of his experience with some recommendations. We didn’t want to keep the bath as we rarely used it; we wanted the space for something we would use every day – a larger, tiled shower enclosure and a drying area.
Carlos pointed out that not having a bath may be an issue when we come to sell the house, but that wasn’t a concern for us. We have no immediate plans to sell, and when we do, there is a full bath in the guest bathroom; we also figured that if they didn’t like the classy new bathroom we had in mind, they probably wouldn’t much like the rest of the house anyway!
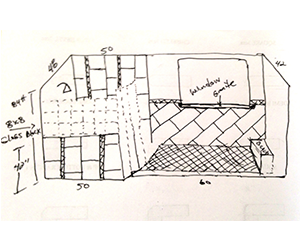
Carlos talked us through our options, including some suggestions to use the space more efficiently. He also outlined the various materials we could choose for the shower enclosure, the floor, and the vanity. He sketched out our combined vision, took some detailed measurements, and left us with a brochure so we could start thinking more seriously about designs and material options. He suggested that after we had browsed the catalog for a few days, we meet him at a tile showroom to pick out some samples and put together a color palette. At that point he could get us a more accurate estimate, based on the actual materials we’d chosen and the measurements he’d taken.
Visiting Tanner Materials
The following weekend Carlos met us at the Tanner Materials showroom, where we could see the huge variety of tiles available. We took along one of our existing floor tiles, which we weren’t going to change at this point, so we could find a good match.
It all came together pretty quickly. We’d narrowed down our options from the brochure, and once we saw the tile for ourselves (rather than in print), it was more about identifying the specific color, and what decorative tile we would use to enhance the final design.
Before we made a definitive decision, Carlos suggested we take home a few different sample tiles so we could look at them in the specific light of our bathroom, at different times of day.
The Final Details
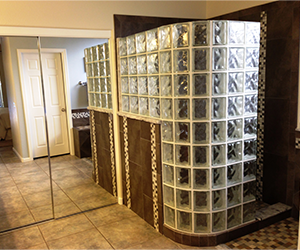
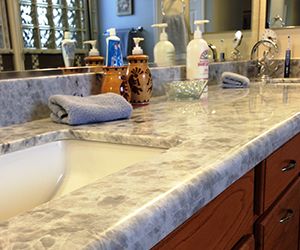
We picked an Italian porcelain tile, with a mosaic floor from the same ‘family’ and a glass mosaic tile as a feature. A glass block wall would allow light through and provide the curve of the shower enclosure. For the vanity, we decided on marble.
Carlos told us that he had some marble slabs at the Arizona Granite showroom in Mesa; he thought they would match well with the porcelain tile we were considering. A couple of days later we met him at Arizona Granite, picked out the slab we liked, and mapped out where the sinks would be cut. We also picked out the under-mount sinks and chose the edging we wanted for the marble vanity – demi-bullnose in case you’re interested.
With our material choices confirmed and the tile chosen, and the price finalized and agreed, we signed the contract, paid the initial 50% of the estimate and scheduled them to start at the end of the following week. Carlos advised that the project, once started, would take around eight to ten business days, so the best part of two weeks in reality. We gave Carlos a deadline of mid April as we had family coming in from overseas; we wanted the inevitable disruption out of the way before they arrived.
The Bathroom Remodel Begins
The day before the job was scheduled to start, Carlos called to confirm the time that the guys would be on site to tear out the shower unit and bath. That night we cleared the counter, emptied the cabinets and removed the draws from under the vanity. We decided to keep our existing cabinets; Arizona Granite can install new cabinets, or resurfacing existing cabinets, but there wasn’t room in our budget for that at the time – maybe later.
We also grabbed everything we needed from the master bedroom, as we would be moving upstairs to a guest bedroom for the duration of the work – our master suite is on the first floor. As we couldn’t move it out of the bedroom, we covered our king-size bed and other large furnishings with dust sheets; Carlos mentioned that it would be a dusty job.
A crew of three arrived the next day; the first thing they did was lay down plastic sheeting to protect the carpet – they would use the patio door in the master bedroom to come and go. They also masked off the closet and created a plastic curtain to try and retain as much of the dust in the bathroom as possible. The dismantling process was actually pretty quick; I think the guys were done in a few hours.
The next day, a Saturday, the plumber arrived to seal off the pipes to the now missing bath, and re-center the drain and prepare the pipe work for the new shower. As can be the case with plumbing, it turned out to be a little more complicated than planned. They had to come back on Monday, but the guys got it done and Carlos managed the entire scheduling process.
Don’t Forget the Faucets
The price you’ll get from Arizona Granite does not include accessories, such as faucets or the shower trim. You could go to Home Depot or Lowes, but the guys suggested we go to Central Arizona Supply; apparently their products are better quality and more durable than you’ll find in those other stores. We were advised by the plumber to consider the Delta brand – a good quality, middle priced range of accessories. Note that you don’t necessarily need the accessories at this stage, other than the valve, maybe a diverter, or anything else that sits behind the wall.
When you go to Central Arizona Supply, make sure to mention the name of the plumber/contractor you’re working with – you’ll get their pricing, which is much better than the standard retail price. Honestly we saved several hundred dollars on the items we bought.
Tile Dust Everywhere!
Once the plumbing was completed on Monday, the team arrived Tuesday to start prepping the walls and the floors. A bench for the drying area, and a pony wall were built; the wall would form part of the shower enclosure and would have glass block sat on top. Once the prep was done, new bathroom began to take shape over the course of the next week or so.
Firstly the mosaic floor tile was put down, then the walls were tiled and grouted, and finally the glass block wall was built to complete the shower enclosure. The final piece of the puzzle to be installed was the vanity counter. The team came in and removed the old counter, and installed the new slab of stone. There were a few minor areas that needed attention once the slab was in place, so Carlos had a guy come out and work on them a few days later.
Carlos managed and scheduled the whole process; different guys arrived to do different elements at different times – the breakdown crew, plumbers, the tile guys, glass block guys, the vanity guys; there were a couple of hitches along the way as you’d expect with so many moving parts, but all in all the project ran very smoothly. Carlos was right though; it was an incredibly messy job with lots of dust, grout, and tile cutting (outside). The glass block wall was incredibly messy, but the guys covered everything in plastic sheeting.
We wanted to complete the transformation by having the bathroom and bedroom painted. Painting is not part of the Arizona Granite service, but we used Carlos’ recommendation for a painter. We dealt with Sergio directly, and scheduled him to come in and paint the day after the vanity – the last piece of the puzzle – was installed. The next day we scheduled a cleaning crew, and we had the carpets cleaned. No matter how well protected things were, dust gets everywhere so I’d recommend those final two steps. The time from tear out to carpet cleaning was two weeks to the day.
A New Bathroom – Transformation Complete
As you can see from the before and after pictures, working with the guys at Arizona Granite has transformed our boring, standard issue cookie-cutter bathroom into a custom master suite. I would definitely recommend Carlos and his team at Arizona Granite for your next bathroom remodel – that’s why we agreed to helping with this case study. The budget didn’t change from the initial agreed estimate, and they were finished in time for our visitors!
Contact Arizona Granite Enterprises Today
To get your bathroom remodel project started, call us at 480-610-1900 to schedule a free, no-obligation in-home bathroom remodel consultation today.